With the price of usb flash disks plummetting, and with the removal of floppy disk drives from computers (but seriously, who uses those 1.44MB devices anymore?), almost everyone is getting themselves one to store documents etc. Some people copy data that they later share with their friends, collegues etc. But due to the portability factor, they might also be storing personal data (financial statements, CVs etc), which they would not like to share with others. So how would you protect these personal items while still be able to share other non sensitive data with others?
There are quite a few tools on the internet for this. One of these that caught my attention is Rohos Mini Drive . Its a freeware with some built in restrictions (for instance the protected partition is limited to 2GB). But it is really cool since it doesnt need a software that you have to install on all the computers you use it on. Once you have configured the software, a hidden partition is created. This partition can only be visible by clicking on the rohos shortcut and inputting the configured password. Once this is done, another disk is visible in your My Computer. Encryption and decrytion of files from/to this partition is seemless.
Give this a try. It might not be the best solution, but surely its better than not having any protection :)
Monday, August 31, 2009
Tuesday, August 18, 2009
Moving MediaMonkey from one PC to another
As you might already know, I use MediaMonkey for all my podcast catching. It is a really great software, one of the best in my view. It downloads the podcasts, auto creates playlists and prunes out those that I have listened to. All that I have to do is to listen to them, which is all that I want to do.
I recently bought a new laptop since my old one was getting a bit too old and wasnt able to run all that I was trying to run on it. As you know, with new laptop comes the migration. I must give myself a big pat on the back to have kept all my files well organised so the copy of the data wasnt too painful. But when it comes to applications, thats another story. I do want to carry my application settings over to my new laptop, so I tried to invest a few minutes into finding out how this could be possible.
This post describes all I did to move the settings from mediamonkey to the new laptop. This meant that I didnt have to recreate the podcast links etc. They were all seamlessly migrated over .. well sorta :).
The steps for the migration are as follows
1. Install MediaMonkey on the new laptop and go through the licensing etc.
2. Start MediaMonkey on the new laptop so that it creates all the folders etc that it needs.
3. Make sure you keep the folder structure same on the new computer to what it was on the old.
4. Copy the folder from C:\Documents and Settings\{username}\Local Settings\Application Data\MediaMonkey to the same location on the new computer (overwriting the folder on the new computer).
5. Start MediaMonkey on the new computer. It will look at the new settings and inherit it.
6. Once it finishes, you will see some tracks that are grayed out or which you know are present but have a wrong path on them. Highlight all such tracks and click on File\Locate Moved/Missing Tracks.
And presto, you are all done.
Now I am off to have a well deserved dinner, if I can figure out what to have that is .
MediaMonkey - one of the best podcast catcher out there
These days almost everyone has got a mp3/mp4 player. From ipods to iphones to a creative zen (which is one of my proud posessions). These devices are really nice music players but they can be used for much much more. I use mine for podcasts especially because it fits into my busy lifestyle. I hardly have time to readup on news stuff but can easily download podcasts that read the latest and greatest news out to me. To make this happen, one needs to get a podcast aggregator. You can easily get free software that does that for you. ITunes is good but not the best. One of the greatest softwares for this, as I found, is MediaMonkey . It allows you to easily create rules to download podcasts, create playlists automatically, delete the listened tracks and synchronise your media player so that you have the latest podcasts on it. It is simply magical and I am so glad I have it. I dont need to worry about anything except fire it up, wait it to finish downloading the podcasts, then connect my Creative Zen, wait for it to synch. And Viola! I am all ready for my journey.
Give it a try and let me know what you think of it.
Give it a try and let me know what you think of it.
Monday, August 17, 2009
Remove hidden data from Office documents
Collaboration holds a very important role in todays world. The web allows multiple people contribute to a document with ease. For instance, the author of the document and the proof reader could be continents apart yet they could share documents within minutes.
When such documents are made available to the general public, care should be taken to not disclose information that needs to be kept private. For instance, records of changes done by each collaborater (change tracking and comments) should be removed before the document is made public. There are two ways this can be done. One is to change the document into a PDF. The other is to use the Office 2003/XP Addin: Remove Hidden Data . This tool is built into Office 2007, so you dont need a separate download.
You can find more details about this tool here
Have fun. Hope your monday is going good.
Sunday, August 16, 2009
Windows requires a digitally signed driver!
Microsoft seems to have an age old vendetta against driver manufacturers. With every new version of Microsoft OS, there are always driver woes that come packaged with it.
Windows 7 is no different. If you are installing system drivers, they need to be digitally signed by Microsoft or else you will get the following message.

Vendors need to purchase a certificate from Microsoft to include in their driver to ensure they dont get the above message. This can be an issue when you have software you already own and are moving to Windows 7. This was the issue I was having when installing Vmware Server on Windows 7.
Fortunately there is a way to get around this issue.
Firstly we need to change a group policy so that windows ignores drivers that are not signed instead of blocking them.
1. Press on Start and then type gpedit.msc in the bottom textfield (this has has got a light gray text that says Search programs and files)
2. The Local Group Policy Editor will start up.
3. Browse down to the Local Computer Policy\User Configuration\Administrative Templates\System\Driver Configuration
On the right side window, double click on Code signing for device drivers
Click on Enable and in options choose Ignore for the When Windows detects a driver file without a digital signature:
4. Close the Local Policy Editor and restart your computer.
5. Install your program.
6. Now you have to note down which drivers are being stopped from running by Windows. Check the event logs (Go to Start and then type eventvwr and press enter and look under System logs)
7. Before anything, disable UAC
8. Then download the Driver Signature Enforcement Overrider 1.3b (DSEO).
9. Install DSEO and start it. You will get the following menu.
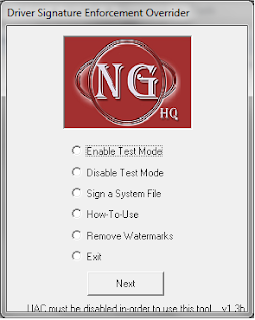
10. Select Test Mode and click Next
11. After that select Sign a System File and click Next. In the path put in the full path and filename of the drivers that you want to sign (step 6 above)
12. Once you have signed all the drivers, restart your computer and that should now run the drivers that you were having problems with.
Hope that helps you all. Cheers.
How to disable UAC in Windows 7 and Windows Vista
For those of you that have moved on to Windows Vista or are pioneering Windows 7, one of the most annoying feature you will come across is the constant nagging when you try installing something or carrying out some system changes. Windows provides you with screens asking if you would like to carry out the task over and over again. Sorta reminds me of donkey from Shrek (are we there yet .. are we there yet .. are we there yet... oooh what a great movie that was). Well if you want, you can easily disable this feature (but be warned that then you will not be asked for a confirmation, even if the task is carried out by some rogue program).
BTW this feature is called User Access Control (UAC)
1. Click on Start and then click on Run.
2. Type msconfig in the window that comes up press enter
3. The System Configuration screen will come up. Click on the Tools tab.
4. Select Change UAC Settings by highlighting it and click on Launch
5. In Vista, a command prompt window comes up while in Windows 7 the User Access Control Settings window will come up.
6. Vista: close the command prompt when it finishes
Windows 7: Select the setting you want and click OK.
7. Restart your computer to activate the settings.
Subscribe to:
Posts (Atom)


